Это вирусы? Если нет, то зачем они? Можно ли их удалять? Мы ответим на самые популярные вопросы.
.cm0013
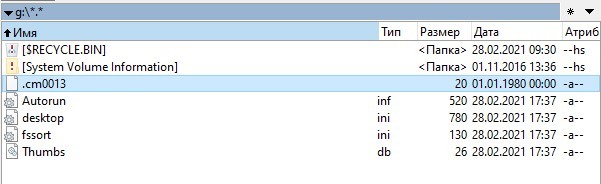
Этот служебный файл автоматически создается на флешке и других мобильных накопителях при подключении к телевизорам, которые используют операционную систему, базирующуюся на Unix-платформе (например, Samsung).
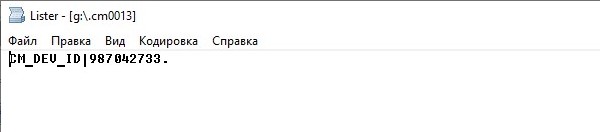
Файл текстовый, хотя и не имеет расширения. Внутри вы найдете одну строчку с текстом типа: CM_DEV_ID|987042733. Считается, что в этих цифрах зашифрована информации о времени, на котором пользователь остановил просмотр видеофайла с флешки. Благодаря файлу вы сможете продолжить просмотр при последующем включении видео.
Размер файла — около 20 байт. Файл можно удалять, тем более, что на флешке порой остается старая версия файла, которая ни на что не влияет.
Может ли под этим именем скрываться вирус? Да. Создатели зловредного ПО могут специально спрятать троян под этим именем. Если на флешке имеется только этот файл, включите отображение скрытых и служебных файлов.
Thumbs.db
Этот служебный файл использовался в старых версиях Windows для хранения эксизов изображений при просмотре в режиме «Эскизы страниц». Благодаря этому при повторном обращении к фотографиям и картинкам они открывались быстрее. Раньше подобные файлы создавались в каждой папке, где вы открывали изображения. В Windows 10 эти файлы хранятся в одной папке — СИСТЕМНЫЙДИСК\Users\ИМЯПОЛЬЗОВАТЕЛЯ\AppData\Local\Microsoft\Windows\Explorer.
В файлах Thumbs.db хрпнчтмч уменьшенные копии изображений популярных форматов: PNG, JPG, BMP, GIF, TIF, PDF и HTML. Каждый файл имеет определенную структуру, которую можно расшифровать с помощью таких программ, как Thumbnail Database Viewer и Thumbcache Viewer, поэтому с флешек такие файлы лучше удалять, если вы не хотите, чтобы эта информация попала к другим людям.
Данный файл имеет атрибут «скрытый». Чтобы его увидеть, включите в Проводнике или файловом менеджере отображение скрытых и служебных файлов. В предыдущих версиях Windows автоматическое создание Thumbs.db можно было отключить. В Windows 10 штатными средствами это сделать не получится.
desktop.ini
Еще один служебный файл, который применялся в старых версиях Windows. В этом файле хранились параметры для отображения папки и ее свойств (вид иконок, имя, свойства доступа и т. п.). Можно удалять.
Autorun.inf
Файл автозапуска, который запускает программу при подключении компакт-диска или флешки к компьютеру (если на ПК не отключен автозапуск). В 2000-е годы вирусописатели часто подменяли этот файл для автозапуска вирусов и троянов. Подобные файлы с флешек лучше удалять, но перед этим посмотрите его содержимое текстовым редактором. Там будет указан путь к запускаемому приложению.
fssort.ini
Этот файл создает менеджер изображений FastStone Image Viewer для автоматического переименования файлов. Файл текстовый, внутри список файлов-изображений, с которыми вы работали. Можно смело удалять.
$RECYCLE.BIN
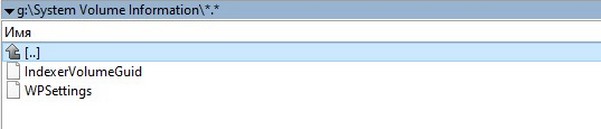
System Volume Information
Это системная папка, где лежат нужные для операционной системы файлы. Удалять нет смысла, так как Windows все равно вернет ее на место.
Расширение файла CM0013
Device Identify Data Format
Что такое файл CM0013?
Полное имя формата файлов, которые используют расширение CM0013: Device Identify Data Format. Формат файла CM0013 совместим с программным обеспечением, которое может быть установлено на системной платформе Linux, Mac OS, Windows. CM0013 файл относится к категории Текстовые файлы так же, как #NUMEXTENSIONS # других расширений файлов, перечисленных в нашей базе данных. NotePad++ text editor поддерживает CM0013 файлы и является наиболее часто используемой программой для обработки таких файлов, но 11 могут также использоваться другие инструменты. Программное обеспечение NotePad++ text editor было разработано Notepad++ Team, и на его официальном веб-сайте вы можете найти дополнительную информацию о файлах CM0013 или программном обеспечении NotePad++ text editor.
Программы, которые поддерживают CM0013 расширение файла
В следующем списке перечислены программы, совместимые с файлами CM0013, которые разделены на категории 3 в зависимости от операционной системы, в которой они доступны. CM0013 файлы можно встретить на всех системных платформах, включая мобильные, но нет гарантии, что каждый из них будет должным образом поддерживать такие файлы.
Программы, обслуживающие файл CM0013
Как открыть файл CM0013?
Причин, по которым у вас возникают проблемы с открытием файлов CM0013 в данной системе, может быть несколько. Что важно, все распространенные проблемы, связанные с файлами с расширением CM0013, могут решать сами пользователи. Процесс быстрый и не требует участия ИТ-специалиста. Ниже приведен список рекомендаций, которые помогут вам выявить и решить проблемы, связанные с файлами.
Шаг 1. Скачайте и установите NotePad++ text editor
 Основная и наиболее частая причина, препятствующая открытию пользователями файлов CM0013, заключается в том, что в системе пользователя не установлена программа, которая может обрабатывать файлы CM0013. Эта проблема может быть решена путем загрузки и установки # РЕКОМЕНДОВАННОЙ # или другой совместимой программы, такой как Sublime Text, Microsoft Windows NotePad, Atom. Выше вы найдете полный список программ, которые поддерживают CM0013 файлы, классифицированные в соответствии с системными платформами, для которых они доступны. Одним из наиболее безопасных способов загрузки программного обеспечения является использование ссылок официальных дистрибьюторов. Посетите сайт NotePad++ text editor и загрузите установщик.
Шаг 2. Обновите NotePad++ text editor до последней версии
 Вы по-прежнему не можете получить доступ к файлам CM0013, хотя NotePad++ text editor установлен в вашей системе? Убедитесь, что программное обеспечение обновлено. Разработчики программного обеспечения могут реализовать поддержку более современных форматов файлов в обновленных версиях своих продуктов. Если у вас установлена более старая версия NotePad++ text editor, она может не поддерживать формат CM0013. Самая последняя версия NotePad++ text editor обратно совместима и может работать с форматами файлов, поддерживаемыми более старыми версиями программного обеспечения.
Шаг 3. Настройте приложение по умолчанию для открытия CM0013 файлов на NotePad++ text editor
Если проблема не была решена на предыдущем шаге, вам следует связать CM0013 файлы с последней версией NotePad++ text editor, установленной на вашем устройстве. Процесс связывания форматов файлов с приложением по умолчанию может отличаться в деталях в зависимости от платформы, но основная процедура очень похожа.
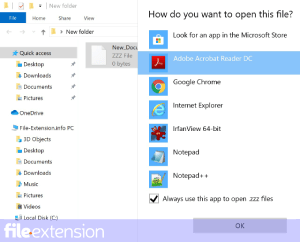
Выбор приложения первого выбора в Windows
Выбор приложения первого выбора в Mac OS
Шаг 4. Проверьте CM0013 на наличие ошибок
Вы внимательно следили за шагами, перечисленными в пунктах 1-3, но проблема все еще присутствует? Вы должны проверить, является ли файл правильным CM0013 файлом. Вероятно, файл поврежден и, следовательно, недоступен.
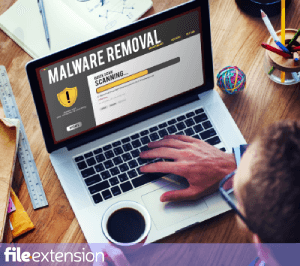
1. Проверьте CM0013 файл на наличие вирусов или вредоносных программ.
Если CM0013 действительно заражен, возможно, вредоносное ПО блокирует его открытие. Рекомендуется как можно скорее сканировать систему на наличие вирусов и вредоносных программ или использовать онлайн-антивирусный сканер. Если сканер обнаружил, что файл CM0013 небезопасен, действуйте в соответствии с инструкциями антивирусной программы для нейтрализации угрозы.
2. Проверьте, не поврежден ли файл
Вы получили CM0013 файл от другого человека? Попросите его / ее отправить еще раз. Возможно, что файл не был должным образом скопирован в хранилище данных и является неполным и поэтому не может быть открыт. Это может произойти, если процесс загрузки файла с расширением CM0013 был прерван и данные файла повреждены. Загрузите файл снова из того же источника.
3. Проверьте, есть ли у пользователя, вошедшего в систему, права администратора.
Некоторые файлы требуют повышенных прав доступа для их открытия. Выйдите из своей текущей учетной записи и войдите в учетную запись с достаточными правами доступа. Затем откройте файл Device Identify Data Format.
4. Убедитесь, что ваше устройство соответствует требованиям для возможности открытия NotePad++ text editor
Если в системе недостаточно ресурсов для открытия файлов CM0013, попробуйте закрыть все запущенные в данный момент приложения и повторите попытку.
5. Убедитесь, что ваша операционная система и драйверы обновлены
Современная система и драйверы не только делают ваш компьютер более безопасным, но также могут решить проблемы с файлом Device Identify Data Format. Возможно, файлы CM0013 работают правильно с обновленным программным обеспечением, которое устраняет некоторые системные ошибки.
Вы хотите помочь?
Если у Вас есть дополнительная информация о расширение файла CM0013 мы будем признательны, если Вы поделитесь ею с пользователями нашего сайта. Воспользуйтесь формуляром, находящимся здесь и отправьте нам свою информацию о файле CM0013.
990x.top
Простой компьютерный блог для души)
cm0013 — что это за файл на флешке?

Приветствую друзья! На флешке мы храним данные — личные, документы, фильмы, музыка.. в общем любые файлы. Но иногда там появляются новые! Откуда? Это могут быть вирусы, но бывает что файлы создают устройства, к которым вы подключаете флешку.
cm0013 — что это такое?
Служебный файл, появляется после подключения флешки к телевизору, содержит данные о позиции, на которой прекратили смотреть фильм. Если подключить внешний жесткий диск — тоже может появится.
Возможно файл может создавать и другое устройство.
Простыми словами: вы смотрели фильм, теперь решили прекратить просмотр, извлекли флешку. Чтобы телевизор смог возобновить просмотр при повторном подключении флешки — нужен cm0013.
Есть мнение, что файл создается, потому что ваш телевизор использует Unix-операционку.
Например такой файл создает телевизор Samsung Smart TV.
Да, конечно если на флешке есть и другие подозрительные файлы/папки, то я бы посоветовал просканировать на вирусы лучшими тремя утилитами: AdwCleaner, HitmanPro и Dr.Web CureIt!. Первые две против рекламного/шпионского ПО, а третья — против опасных вирусов типа троянов, червей, ботнетов.
Иногда файл вызывает проблемы:
 Сообщение с форума iXBT.
Бывает на флешке и Thumbs.db:
 Thumbs.db содержит эскизы изображений, когда вы в папке включаете режим просмотра Эскизы страниц. Да, можно удалить, как я понимаю он нужен чтобы при повторном заходе в папку эскизы отображались быстрее.
cm0013 — можно ли удалить?
Получается что можно. При условии что вам не нужна функция возобновления просмотра фильма с предыдущей точки остановки.
Однако при повторном подключении флешки к телевизору — файл снова появится.
Важно! После удаления файла телевизор может определять флешку заново, прибавив к концу названия (2). И если файл удалить снова, то телевизор может прибавить к названию (03). Поэтому возможно лучше и не удалять. Инфу взял с форума iXBT.
cm0013 — вирус?
Как мы выяснил — нет.
Однако я нашел такое необычное сообщение на форуме:

Если все ваши данные на флешке исчезли и остался файл/папка cm0013, то это может быть вирус. Некоторые вирусы специально скрывают все данные, оставляя только один файл и все для того чтобы вы запустили его. Этим действием вы заразите ПК вирусом. После запуска могут показаться все данные на флешке. Но запускать такой файл разумеется не стоит.
Что в таком случае делать? Самое главное — сделать все файлы/папки на флешке видимыми. Как это сделать я уже писал здесь:
Также там есть и другая полезная информация. Повторюсь, если на флешке были файлы/папки, а потом они куда-то исчезли и осталось только cm0013 — обязательно выполните команду отображения скрытых файлов/папок.
Заключение
Установка CyanogenMod 13 на Android-устройстве
В конце ноября разработчики CyanogenMod начали выпуск первой партии «ночных» прошивок CM13. Напомню, что они созданы уже на базе Android 6.0 Marshmallow, хотя в нынешнем состоянии они не предлагают никаких новых возможностей по сравнению с CM12 или CM12.1. Обновление функционала должно произойти в ближайшие несколько месяцев.
Если вы уже успели установить на вашем Android-устройстве прошивку CyanogenMod 12/12.1, то у вас нет серьезных причин для установки обновления CM13. Как я заметил выше, никаких новых функций вы не получите, однако новая прошивка имеет много исправлений и улучшений производительности по сравнению с Lollipop-сборками.
По традиции команда разработчиков CM предлагает два разных варианта сборок: «ночные» и стабильные. Как предполагает название, первые выпускаются каждую ночь командой CyanogenMod. Другими словами, в них есть экспериментальные функции без обещания, что все это будет работать стабильно и не будет проблем с производительностью.
Спустя несколько недель или даже месяцев тестирования, команда CM выпускает стабильную сборку для целого ряда поддерживаемых устройств. Выпуск финальной версии прошивки занимает несколько месяцев, так что если вы не хотите ждать так долго, то при сильном желании можно использовать «ночную» сборку спустя несколько недель после ее появления, так как наверняка такой вариант будет работать достаточно стабильно. Если вы заинтересованы в этом, то скачать «ночные» и стабильные версии прошивок CyanogenMod 13 можете отсюда.
По умолчанию разработчики CyanogenMod не включают никаких стоковых приложений от Google из-за проблем с лицензированием. Потому после установки прошивки в любом случае придется воспользоваться дополнительным пакетом Gapps, чтобы на вашем смартфоне или планшете были приложений Google Play, Карты и другие сервисы от Google. Установка пакета Gapps проходит в точности как установка любого zip-файла с помощью кастомного рекавери. Совместимый пакет Gapps для CyanogenMod 13 (Android 6.0) можно скачать отсюда.
Подготовка к установке CyanogenMod:
Установка CyanogenMod 13 обязательно требует иметь root-права на вашем Android-устройстве, а также установленный кастомный рекавери (TWRP, к примеру). Больше никакого другого варианта установки CM прошивки нет. Лучше убедиться, что вы на своем смартфоне имеете последнюю версию TWRP, так как старые версии рекавери не совместимы с Marshmallow прошивкой и установить zip-файл CM13 не получится.
Дополнительно можно порекомендовать ознакомиться в специальной ветке форума с отзывами других пользователей с точно таким же Android-устройством, которые уже успели установить и протестировать прошивку CM13. Это даст вам хорошее представление о возможностях самой сборки и о проблемах, которые вдруг могут появиться.
Обязательно перед установкой прошивки сделайте резервную копию всех данных. Это включает в себя контакты, сообщения, фотографии, музыку и другие важные документы и файлы. Это легко можно сделать с помощью Titanium Backup, хотя вы можете столкнуться с проблемой совместимости при попытке установить его на CyanogenMod 13.
На некоторых устройствах, возможно, придется сделать обновление загрузчика и перепрошивки радио-модуля на последние доступные версии, но обязательно перед установкой CM прошивки. Невыполнение этого условия может привести к проблемам с камерой, датчиками. В общем, ваше Android-устройство вряд ли будет работать должным образом.
Установка CyanogenMod 13:
Шаг 1: Скопируйте zip-файлы прошивки CyanogenMod 13 и Gapps в память своего смартфона или планшета. Всегда рекомендую перепроверить, скачали ли вы нужную версию CM прошивки и пакета Gapps.
Шаг 2: После копирования файлов вам нужно перезагрузить устройство в режим рекавери. Обычно для этого нужно выключить Android-смартфон (планшет), затем зажать одновременно кнопки увеличения громкости и питания. Однако этот способ не всегда подходит, а потому как совет – установите из Google Play приложение Quick Reboot и в меню программы из предложенных вариантов нажмите Recovery. Есть еще вариант с использованием вашего компьютера и Android SDK, но он более трудоемкий.
Шаг 3: После того как устройство загрузится в режиме рекавери вы должны будете выбрать команды wipe the /data и /system partitions (на фото). Уже после этого делаем сброс настроек (factory reset). Не используйте опцию очистки данных или очистки внутренней памяти устройства. Чтобы форматировать системный раздел, выберите «Advanced Wipe», затем «System» в списке разделов. Подтвердите выбор, передвинув ползунок вправо.
Шаг 4: Теперь переходим непосредственно к установке прошивки CyanogenMod. Жмем на кнопку «Install» в TWRP, затем указываем zip-файл с CM прошивкой, которую вы скопировали в шаге 1. Если вы не можете найти этот файл, то обязательно перепроверьте, если вы находитесь в подкаталоге /sdcard.
 Установка CyanogenMod 13
Шаг 5: Перезагрузите устройство, нажав на опцию «Reboot system». Первая перезагрузка может потребовать больше времени, чем обычно, так что наберитесь терпения. В случае, если система не загрузится в течение 10-15 минут, то вам придется повторить предыдущие шаги установки прошивки.
Шаг 6: После того, как вы увидите рабочий стол, дайте еще несколько минут Android-устройству для полной загрузки всех необходимых процессов. И после этого опять придется перезагрузиться в режим рекавери для установки пакета Gapps. Установка идентичная, но выбрать нужно уже другой zip-файл, который вы также скопировали в память на шаге 1.
Шаг 7: После установки zip-файла можете снова перезагрузить систему. Потребуется войти в свой Google-аккаунт и загрузить ваши любимые приложения и игры.
Если вы вдруг установили «ночную» сборку CM13, то обновление прошивки на более новую версию потребует от вас не полного процесса установки – нужно проделать шаги 4-7. Это избавит вас от форматирования системного раздела и очистки данных, а также вы не потеряете уже установленные приложения.
Файл cm0013 что это
The code for CM-SS13 is licensed under the GNU Affero General Public License v3, which can be found in full in /LICENSE-AGPL3.
Assets including icons and sound are under the Creative Commons 3.0 BY-SA license unless otherwise indicated. Authorship for assets including art and sound under the CC BY-SA license is defined as the active development team of CM-SS13 unless stated otherwise (by author of the commit).
All code is assumed to be licensed under AGPL v3 unless stated otherwise by file header. Commits before 9a001bf520f889b434acd295253a1052420860af are assumed to be licensed under GPLv3 and can be used in closed source repo.
CONTRIBUTING TO CM-SS13
CM-SS13 doesn’t have a list of goals and features to add; we instead allow freedom for developers to suggest and create their ideas for the game. That doesn’t mean we aren’t determined to squash bugs, which unfortunately pop up a lot due to the deep complexity of the game. Here are some useful starting guides, if you want to contribute or if you want to know what challenges you can tackle with zero knowledge about the game’s code structure.
While developers have the freedom to work on whatever they want, it falls to the team as a whole to decide if changes to the repository should be merged or not. This means that a merge request or change may be denied at the end, so understand that creative freedom does not grant you full reigns to commit anything to the repository without review, and you may have to deal with change requests or potential denial of your change.
To start contributing:
Download and install your git client. GitKraken is recommended.
Register and log into Gitlab. Wait for the Repository Owner to grant you access.
Clone the repository with your git client.
Host
The Owner is responsible for controlling, adding, and removing maintainers from the project. While the Head Developer is officially in charge of the Development team, the Owner is a formal position to ensure ownership of the repository remains in the hands of the Hosts.
Head Developer
The Head Developer has the final say on what changes get into and out of the repository. He or she has full veto power on any feature or balance additions, changes, or removals, and establishes a general, personally-preferred direction for the game. The Head Developer is also the Development team lead, and manages team structure, direction, composition and integrity.
System Administrator
The System Administrator assists the Host & Vice Host in managing and maintaining the security and day-to-day operation of the game server and its myriad configuration details. They must be available and online often and easily enough via readily-available means of communication i.e. Discord for emergencies.
While not directly a part of the development team, the System Administrator has access to branch switching, repository access, and relevant dev channels for the purpose of supporting the team when needed.
Maintainers
Maintainers are responsible for doing reviews on any contributions made to CM by contributors and fellow developers in their respective fields of expertise. Maintainers are considered to be above normal developers in their own fields and can override decisions made by another developer or contributor should they deem it necessary.
Gameplay Architects
Gameplay Architects’ (GA) oversees the balance of features and content going into the repository and decide on the games overall balance, this includes old content that have been added in the past and they may request changes to merge requests on the grounds of balance. GA’s can also authorize pure number changes for a contributor to make, but it is still susceptible for review by other GA’s.
Developers
Developers refers to everyone in the development team. As a part of the development team, you are required to meet the guidelines and standards set by the Leads and the team when contributing to the repository. As well as contributing to the repository, Developers are in charge of handling the review of open MRs, as well as the management of suggestions and issues.
Contributors
Contributors refer to anyone outside of the development team contributing to the repository in the form of MRs. Much like Developers, you are required to follow this document with regards to code quality and standards. As a contributor, you may only open MRs with changes related to bugs, runtimes, or Accepted Suggestions on the Gitlab issue tracker, which are handled by the development team.
All Merge Requests (except Dev to Master MRs) must either target a work-in-progress branch, or the Dev branch. No one may push to master.
All features added to Dev must come through a Merge Request. No one, except for changelog merges during a Dev to Master MR, may push to Dev without a Merge Request.
All Merge Requests (except Dev to Master MRs) should be appropriately tagged. Any MR that is not complete and ready for review should be marked with a WIP: in the title and the DO NOT MERGE tag. Add any tags that apply to your MR, without being excessive.
Merge Requests should include a copy of the changelog entries for that branch in its description or, if no changelog is required (hotfixes, typo corrections, and other very minor changes) include a description of the changes manually (unless it can be fully explained in the MR title).
Merge Requests targeting Dev should be set to squash commits and remove the branch when the merge is complete to keep the repository clean. Merge requests to Master should never do this.
All Merge Requests must wait for the CI pipeline to complete before merging unless there is a confirmed issue with the unit tests themselves.
All Merge Requests require two valid Approvals to merge into Dev immediately, or one valid Approval by a Developer or higher and at least 24 hours of awaiting further approval. See Approvals below to determine who/when to approve an MR. MRs should only be approved once all discussions opened during review of the MR are resolved.
All Merge Requests should have one of the following tags:
Merge requests should not include multiple sweeping changes unrelated to each other. Developers must split up and create multiple MRs for each of their changes where necessary so as to keep them organized as their own standalone feature or change. The only time multiple changes in an MR is acceptible is when submitting bugfixes to the repository.
Once a Merge Request is approved and merged into Dev, ensure that all changelog files are forwarded to the Wiki Maintainer, as well as any art assets or additional information they request; changes that are not included in the Changelog, but can be accessed or interacted with by players, should additionally be forwarded to the Wiki Maintainer.
Changelogs follow a specific format. To correctly create a changelog, make a copy of Example.yml and do the following:
These files are used by the changelog generation tool (see Dev Tool Usage below) to create cohesive, conflict-free changelog entries.
Potential bugs can be submitted to the project issue tracker on GitLab. While we appreciate suggestions, they should not be posted here to make triaging technical issues and fixing bugs easier. You are encouraged to use the official CM13 discord instead for this, in particular the #ideaguys channel for feature suggestions of all kind and what-ifs.
When submitting an issue, use the provided template. A few things to keep in mind for a good issue report maximizing the chance of finding and fixing it:
As mentioned before, you are expected to follow these specifications in order to make everyone’s lives easier. It’ll save both your time and ours, by making sure you don’t have to make any changes and we don’t have to ask you to.
You touch it, You fix it clause
If you make more than minor changes to a piece of poor or legacy code a maintainer may force you to bring the whole section of code up to current coding standards.
Don’t use dreammaker
For coding it’s recommended you use VS Code (and install the recommended plugins that it suggests to you automatically, see: (here)[.vscode\extensions.json])
For mapping it’s recommended you use StrongDmm.
Object Oriented Code
As BYOND’s Dream Maker (henceforth «DM») is an object-oriented language, code must be object-oriented when possible in order to be more flexible when adding content to it.
All BYOND paths must contain the full path
(i.e. absolute pathing)
DM will allow you nest almost any type keyword into a block, such as:
The use of this is not allowed in this project as it makes finding definitions via full text searching next to impossible. The only exception is the variables of an object may be nested to the object, but must not nest further.
The previous code made compliant:
All process procs need to make use of delta-time and be frame independent
In a lot of our older code, process() is frame dependent. Here’s some example mob code:
As the mobs subsystem runs once every 2 seconds, the mob now loses 4 health every process, or 2 health per second. This is called frame dependent programming.
Why is this an issue? If someone decides to make it so the mobs subsystem processes once every second (2 times as fast), your effects in process() will also be two times as fast. Resulting in 4 health loss per second rather than 2.
How do we solve this? By using delta-time. Delta-time is the amount of seconds you would theoretically have between 2 process() calls. In the case of the mobs subsystem, this would be 2 (As there is 2 seconds between every call in process() ). Here is a new example using delta-time:
In the above example, we made our health_loss variable a per second value rather than per process. In the actual process() proc we then make use of deltatime. Because SSmobs runs once every 2 seconds. Delta_time would have a value of 2. This means that by doing health_loss * delta_time, you end up with the correct amount of health_loss per process, but if for some reason the SSmobs subsystem gets changed to be faster or slower in a PR, your health_loss variable will work the same.
For example, if SSmobs is set to run once every 4 seconds, it would call process once every 4 seconds and multiply your health_loss var by 4 before subtracting it. Ensuring that your code is frame independent.
No overriding type safety checks
The use of the : operator to override type safety checks is not allowed. You must cast the variable to the proper type.
Type paths must begin with a /
Type paths must be snake case
Datum type paths must began with «datum»
In DM, this is optional, but omitting it makes finding definitions harder.
Do not use text/string based type paths
Do not put type paths in a text format, as there are no compile errors if the type path no longer exists. Here is an example:
Use var/name format when declaring variables
While DM allows other ways of declaring variables, this one should be used for consistency.
You must use tabs to indent your code, NOT SPACES.
Do not use tabs/spaces for indentation in the middle of a code line. Not only is this inconsistent because the size of a tab is undefined, but it means that, should the line you’re aligning to change size at all, we have to adjust a ton of other code. Plus, it often time hurts readability.
Hacky code, such as adding specific checks, is highly discouraged and only allowed when there is no other option. (Protip: «I couldn’t immediately think of a proper way so thus there must be no other option» is not gonna cut it here! If you can’t think of anything else, say that outright and admit that you need help with it. Maintainers exist for exactly that reason.)
You can avoid hacky code by using object-oriented methodologies, such as overriding a function (called «procs» in DM) or sectioning code into functions and then overriding them as required.
No duplicated code
Copying code from one place to another may be suitable for small, short-time projects, but CM is a long-term project and highly discourages this.
Instead you can use object orientation, or simply placing repeated code in a function, to obey this specification easily.
Startup/Runtime setup of lists and the usage of LAZY operations
First, read the comments in this BYOND thread, starting where the link takes you.
Lazy instantiation as a whole is about not instantiating objects before you actually use them. In terms of lists this means only declaring (but not defining) your list in the definition or defining it as null.
Other defines are LAZYLEN(L) which gives you the length of the list, LAZYISIN(L, I) which is basically an in keyword replacement, and LAZYCLEARLIST(L) which clears the full list for you.
One important thing to note is that all these defines have null safety. I.e. it’ll check if the list exists first for you and create it if it doesn’t when needed.
Prefer Initialize() over New() for atoms
Use qdel() over del() for deleting atoms
All datums must correctly nullify and delete all stored references to other datums within their Destroy() proc. The Destroy() proc should call parent, return its deletion hint or one of its own, and never be called directly.
No magic numbers or strings
This means stuff like having a «mode» variable for an object set to «1» or «2» with no clear indicator of what that means. Make these #defines with a name that more clearly states what it’s for. For instance:
There’s no indication of what «1» and «2» mean! Instead, you’d do something like this:
This is clearer and enhances readability of your code! Get used to doing it!
Use TRUE and FALSE for boolean logic instead of 1 and 0.
Do not enclose a proc in an if-block when returning on a condition is more feasible This is bad:
This prevents nesting levels from getting deeper then they need to be.
Use our time defines
The codebase contains some defines which will automatically multiply a number by the correct amount to get a number in deciseconds. Using these is preffered over using a literal amount in deciseconds.
The defines are as follows:
Getters and setters
Prefer to either access the variable directly or use a macro/define.
Avoid unnecessary type checks and obscuring nulls in lists
Typecasting in for loops carries an implied istype() check that filters non-matching types, nulls included. The as anything key can be used to skip the check.
If we know the list is supposed to only contain the desired type then we want to skip the check not only for the small optimization it offers, but also to catch any null entries that may creep into the list.
Nulls in lists tend to point to improperly-handled references, making hard deletes hard to debug. Generating a runtime in those cases is more often than not positive.
All procs that are registered to listen for signals using RegisterSignal() must contain at the start of the proc SIGNAL_HANDLER eg;
This is to ensure that it is clear the proc handles signals and turns on a lint to ensure it does not sleep.
Enforcing parent calling
When adding new signals to root level procs, eg;
The SHOULD_CALL_PARENT(TRUE) lint should be added to ensure that overrides/child procs call the parent chain and ensure the signal is sent.
Use descriptive and obvious names
Don’t use abbreviations
Avoid variables like C, M, and H. Prefer names like «user», «victim», «weapon», etc.
Unless it is otherwise obvious, try to avoid just extending variables like «C» to «carbon»—this is slightly more helpful, but does not describe the context of the use of the variable.
Naming things when typecasting
When typecasting, keep your names descriptive:
Of course, if you have a variable name that better describes the situation when typecasting, feel free to use it.
Note that it’s okay, semantically, to use the same variable name as the type, e.g.:
Your editor may highlight the variable names, but BYOND, and we, accept these as variable names:
Name things as directly as possible
Avoid negative variable names
Exceptions to variable names
Exceptions can be made in the case of inheriting existing procs, as it makes it so you can use named parameters, but new variable names must follow these standards. It is also welcome, and encouraged, to refactor existing procs to use clearer variable names.
Naming numeral iterator variables i is also allowed, but do remember to Avoid unnecessary type checks and obscuring nulls in lists, and making more descriptive variables is always encouraged.
Use Type macros for commonly used typechecks
If you need to use a typecheck multiple times for a specific type path, create an istype macro within the #define/type_check folder.
Develop Secure Code
Player input must always be escaped safely, we recommend you use stripped_input in all cases where you would use input. Essentially, just always treat input from players as inherently malicious and design with that use case in mind
All calls to topics must be checked for correctness. Topic href calls can be easily faked by clients, so you should ensure that the call is valid for the state the item is in. Do not rely on the UI code to provide only valid topic calls, because it won’t.
Information that players could use to metagame (that is, to identify round information and/or antagonist type via information that would not be available to them in character) should be kept as administrator only.
Because runtime errors do not give the full path, try to avoid having files with the same name across folders.
File names should not be mixed case, or contain spaces or any character that would require escaping in a uri.
Files and path accessed and referenced by code simply being #included should be strictly lowercase to avoid issues on filesystems where case matters.
TGM Format & Map Merge
Variable Editing (Var-edits)
Dream Maker Quirks/Tricks
Like all languages, Dream Maker has its quirks, some of them are beneficial to us, like these
HOWEVER, if either some_value or i changes within the body of the for (underneath the for(. ) header) or if you are looping over a list AND changing the length of the list then you can NOT use this type of for-loop!
Placement of operators and bracketing can affect the outcome of certain logic within DM code, and it’s important to make sure you are writing the correct condition checking when making situationals.
A common mistake that’s easy to fall for is that bitwise AND has a lower operator precedence than equality checks, so a & b == c evaluates to a & (b == c) instead of (a & b) == c as most sane people would probably expect
Globals versus static
DM has a var keyword, called global. This var keyword is for vars inside of types. For instance:
Isn’t that confusing?
There is also an undocumented keyword called static that has the same behaviour as global but more correctly describes BYOND’s behaviour. Therefore, we always use static instead of global where we need it, as it reduces suprise when reading BYOND code.
Bitflags are a method of defining properties of an atom in order to pass or fail checks in other sections of the code. Bitflags should be used as a replacement for any single true/false boolean variable that may be tied to a type, so that atom defines do not end up with hundreds of unique booleans to track.
Additionally, always use bitshift formatting as shown above when defining bitflags.
You are limited to 24 bits when doing bitwise operations, eg (1 is the biggest bitflag supported.
In the case where span classes are required, for strings and text to be displayed to a user, span macros should be used to encapsulate and style where necessary.
Code should be modular where possible; if you are working on a new addition, then strongly consider putting it in its own file unless it makes sense to put it with similar ones (i.e. a new tool would go in the «tools.dm» file)
Bloated code may be necessary to add a certain feature, which means there has to be a judgement over whether the feature is worth having or not. You can help make this decision easier by making sure your code is modular.
You are expected to help maintain the code that you add, meaning that if there is a problem then you are likely to be approached in order to fix any issues, runtimes, or bugs.
If you used regex to replace code during development of your code, post the regex in your MR for the benefit of future developers.
Changes to the /config tree must be made in a way that allows for updating server deployments while preserving previous behaviour. This is due to the fact that the config tree is to be considered owned by the server and not necessarily updated alongside the remainder of the code. The code to preserve previous behaviour may be removed at some point in the future given the OK by developers.
English/British spelling on var/proc names
Space usage in control statements
Space usage in lists
Merge Request Process
Make sure your merge request complies.
You are going to be expected to document all your changes in the merge request. Failing to do so will mean delaying it as we will have to question why you made the change. On the other hand, you can speed up the process by making the merge request readable and easy to understand, with diagrams or before/after data.
Use the changelog system to document your change, which prevents our players from being caught unaware by changes.
If you are proposing multiple changes, which change many different aspects of the code, you are expected to section them off into different merge requests in order to make it easier to review them and to deny/accept the changes that are deemed acceptable.
If your merge request is accepted, the code you add no longer belongs exclusively to you but to everyone; everyone is free to work on it, but you are also free to support or object to any changes being made, which will likely hold more weight, as you’re the one who added the feature. It is a shame this has to be explicitly said, but there have been cases where this would’ve saved some trouble.
Explain why you are submitting the merge request, and how you think your change will be beneficial to the game. Failure to do so will be grounds for rejecting the MR.
If your merge request is not finished make sure it is at least testable in a live environment. merge requests that do not at least meet this requirement will be closed. You may reopen the merge request when you’re ready, or make a new one.
Valid Approvals are required for an MR to be merged to Dev. Approving an MR implies that certain actions have been taken by the approving party and that certain conditions are met:
All Merge Requests must wait for the CI pipeline to complete before merging unless there is a confirmed issue with the unit tests themselves.
Merge Requests require two valid Approvals to merge into Dev immediately, or one valid Approval by a Developer or higher and at least 24 hours of awaiting further approval. MRs should only be approved once all discussions opened during review of the MR are resolved.
Once a Merge Request is approved and merged into dev, ensure that all changelog files are forwarded to the Wiki Maintainer, as well as any art assets or additional information they request.
The master branch, in place to act as the stable build of the game, should remain separate from upcoming changes in the dev branch.
In order to update master with new changes, a «dev to master» must be overseen by the Head Developer. This is performed by submitting a Merge Request from dev into master. Before merge, all changelogs must be compiled via the changelog generation tool.
Dev to masters must be preceded by a period of live testing on the dev branch, and any new runtimes and bugs must be handled before a merge is considered.
Testing of new features is absolutely vital to ensuring smooth integration of new and changed content. It’s also deceptively necessary even for small bugfixes and features or tiny tweaks; it’s all too easy to change just a line or two, assume that it works, and push it because it compiles.
Unit Testing allows you to run large scale tests quickly by writing out a set of instructions for the server to run by itself. They can be defined under /test and can be triggered in the debug tools, as well as during any MR build test. When the code can be tested quickly by the server, consider writing a unit test for it (meaning if your code has to wait for an event or sleep, don’t write a test).
The following are mandatory before merging an MR into Dev, to be overridden only by those with Dev to Master merge permissions, and only in emergency or immediately-rectifiable cases (i.e. a single forgotten escape character or quotation mark to close a string).
Dream Daemon can be unintuitive to set up. This document will cover the basic steps for setting up a local instance for testing with. It won’t go over port forwarding; Google handles that nicely.
Be sure Dream Daemon is inactive when compiling, as it locks up assets and prevents recompiling in some cases.
The Host, System Administrator, Head Developer, and Senior Developers can change which branch is active on the game server. This allows the Team to test a feature without spoiling other upcoming features in Dev, to test Dev features for a short time to gather feedback before permanent release, and so on.
Senior Developers+ may authorize a test. The Head Dev must be informed of what is being tested and when, prior to conducting the test; it is not necessary to request specific permission to run a test so long as it is authorized by a Senior Developer+, only to ensure that the Head Dev is aware of it.
Public tests must be supervised by at least one Developer+, with the change owner either being present or authorising another Developer+ to oversee their test. Any stand-in Developers for the author must be fully aware of the test’s changes and functionality.
This repository uses LF line endings for all code as specified in the .gitattributes and .editorconfig files.
Unless overridden or a non standard git binary is used the line ending settings should be applied to your clone automatically.
Note: VSC requires an extension to take advantage of editorconfig.