Barotrauma – Character Builder’s Guide
This is the Barotrauma dev team’s official manual for building your own characters using the in-game character editor. The manual is not comprehensive, but it does go into some technical detail. A video tutorial is planned to follow later, but I feel that some things are better explained in text format.
Other Barotrauma Guides:
Introduction
Tip: Use keys [1], [2], and [3] on your keyboard to quickly switch between the limb, joint, and animation edit modes.
Creating a New Character
It’s currently easiest to create fish- or wormlike creatures – anything that walks is a bit trickier at the moment. So, ideally don’t attempt a crab with 10 legs as your first character.
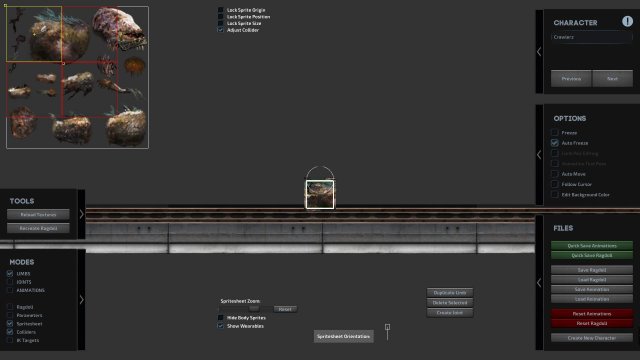
To create a new character, click the ‘Create New Character’ button found on the ‘Files’ panel. The following view will ask for basic information about the character you are about to create. The paths to the config file and the texture path are both relative to the Barotrauma project folder.
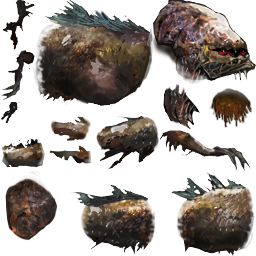
One thing you should have on hand at this point is a texture for the character. In Barotrauma, all characters are made of limbs that have a sprite. In practice, you’ll need a sprite sheet, where the sprites for all the limbs of your character are found. Write the path to the texture file in the ‘Texture Path’ field.
You also need to select or create a new content package for the character, which contains the custom content for the game. A content package is essentially a mod. Select the content package you want to use for the character or create a new content package by providing a name for it and clicking the ‘Create New’ button.
The third thing you will need is a character config file, but that will be automatically created for you. You can define a path for it in the ‘Config File Output’ field. The default should be fine too.
Once you have filled out the basic information, it’s time to create some limbs. Use the ‘+’ and ‘-‘ buttons to add or remove limbs. You can easily add multiple limbs by defining a 2D grid (the ‘X’ and ‘Y’ fields) and pressing the ‘Add Multiple’ button.
Don’t worry too much about the definitions here. We just want to add some limbs that we can edit later on. It’s also possible but currently not advised to define the joints here. It can be done later much more easily.
The File Structure
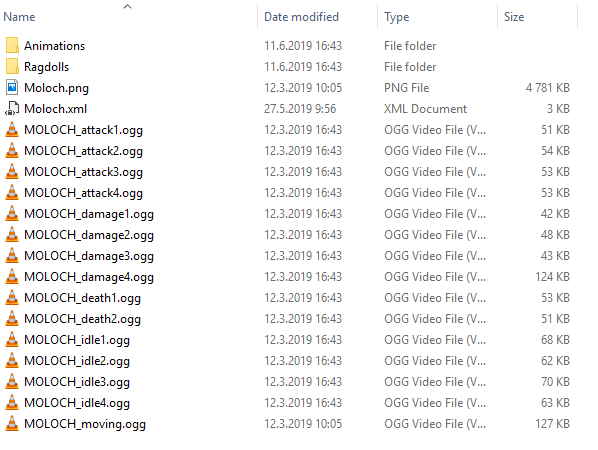
When you create a new character, you are asked to define a path for the character config file (e.g. Mods/MyMod/Characters/Mycharacter.xml). It’s strongly advised that the texture and sound files are placed in the same folder or in subfolders at the same location as the character config file.
When a new character is created in the editor, the system automatically adds the reference to the character config file in the content package and creates the animation and ragdoll files for you.
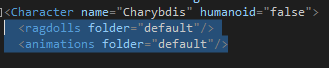
If for some reason you don’t want to use the default paths, you can change the paths in the character config, by changing the values for the ‘folder’ attributes of ‘ragdolls’ and ‘animations’ elements.
Important: Don’t rename the animation or ragdoll files or the game won’t be able to use them. This will hopefully be changed at some point, but for now, use the default filenames.
Important: To avoid issues with the file structure, please capitalize the first letter in the character name and nothing else. The character name should match the folder name.
Tip: You can have multiple ragdolls and animations for a single character, but currently only the defaults are used in-game.
Editing Limbs
When you are done with adding some limbs, click the ‘Create’ button. At first, your character will look a terrible mess with all the limbs on top of each other. This is because there aren’t any joints yet to join and keep apart the different limbs. For now, let’s just ignore how the character looks in the game view; it won’t look right before we add the joints.
Tip: You can add limbs after creating joints and create joints before the limbs are final. However, it’s easier to define the limbs first. Then the joints. And then iterate.
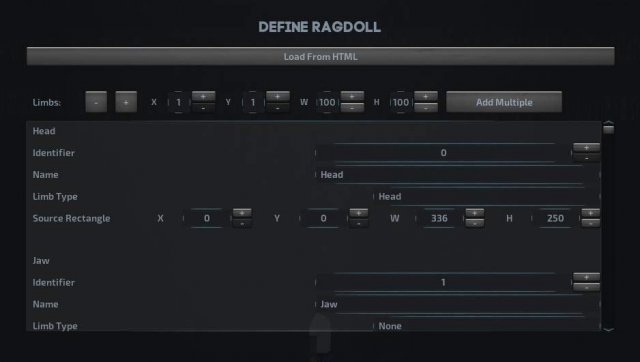
Before going into how we add joints, we should first adjust the source rects and the colliders of the limbs. Source rects are simply definitions about the position and the dimensions of the limb; they mark where the limb is on the texture file (in pixels). Colliders, on the other hand, are the physical definitions of the limbs. They determine how the limbs move in the game world.
OK, let’s start editing. First, make sure that you have the ‘Spritesheet’ and ‘Limbs’ toggles selected on the ‘Modes’ panel. Also cross over the ‘Adjust Collider’ toggle found on top of the screen.
Tip: You can change the collider shape by adjusting the collider dimensions from the parameters. Enable the ‘Parameters’ toggle to see the parameters of the selected limb.
You’ll now see the colliders of the limbs drawn in green over your character. Select the limbs over the sprite sheet. Drag the small box in the top left corner to move the source rect, and the box in the bottom right corner to adjust the size of the source rect (and the collider).
Important: When the ‘Adjust Collider’ mode is enabled, the colliders are automatically recalculated. If the colliders are of the wrong size, the collisions won’t work right. If the colliders are too small, the ragdoll can be unstable and even explode.
Tip: Use the arrow keys to move the source rect one pixel at a time.
You can add more limbs by duplicating an existing limb. Select a limb and click ‘Duplicate Limb’ [ctrl+c]. The new limb should now be selected. Drag the source rect to a position where you want it and adjust the size, just like you did with the other limbs. Most of the limbs can also be deleted [delete], but there are some restrictions to this.
Creating Joints
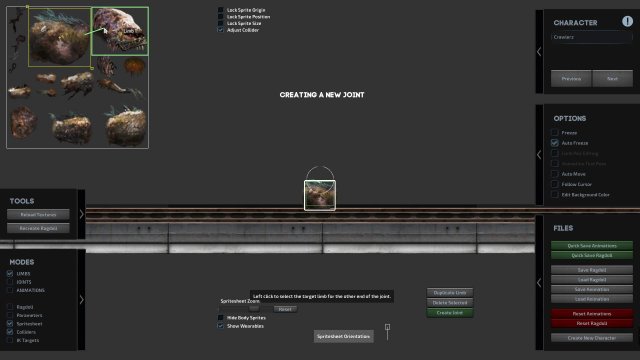
When you are done with the main limbs (you don’t have to define all of them at once), you can start creating joints between the limbs.
Make sure to have the ‘Limbs’ mode selected. Then select a limb, and click the ‘Create Joint’ button [ctrl+e]. You can now draw a joint between two limbs. The starting point of the joint was defined when you pressed the button or the hotkey, and now you need to define the other end of the joint. To do that, hover your mouse over the limb you want and select it with the left mouse button.
Tip: Press [ctrl] to select and edit multiple limbs or joints at the same time.
Tip: In the joint editing mode, click ‘Copy Joint Settings’ to copy the settings of the first selected joint to the other joints.
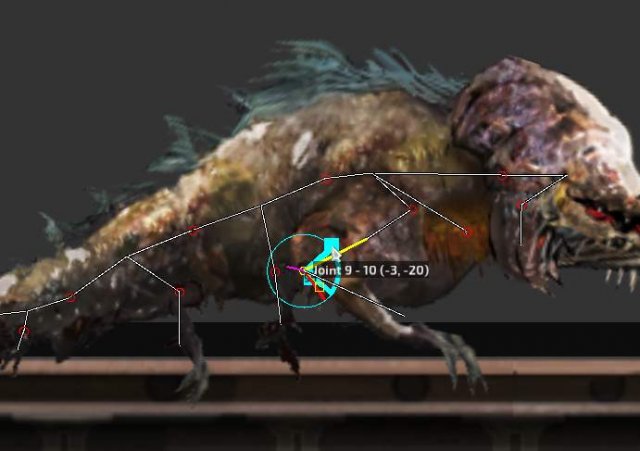
The editing mode should now automatically change to ‘Joints’. In this mode, we can see the joint ends drawn as red circles. If you select one of the circles, it will change the color and show three small widgets next to each end of the joint.
Tip: You can edit and create limbs and joints also over the character in the game view, but it’s usually easier to do it on the sprite sheet.
Try dragging the circular widget. This is the anchor point of the joint. It defines the point from where the limb is attached to the other limb. The longer the distance between the two ends, the longer the joint. And the longer the joint, the farther the limbs are from each other.
Tip: If the limbs seem to be on top of each other and the joint ends look correct on the sprite sheet but wrong in the game view, try flipping the joint ends (i. e. just drag them so that they swap places).
Tip: By default, the rotations start from the top and end at the bottom, but the ‘Spritesheet Orientation’ has an effect on this. Click ‘Spritesheet’ on the ‘Modes’ panel to see the orientation controls.
It’s possible, for example, to define some of the limbs from left to right and others from top to bottom, but currently you can only have one universal offset for the character. You can freely change the orientation depending on which joint you are currently editing, but it’s a lot easier if at least most of the limb sprites are laid out in the same orientation in the sprite sheet.
The ‘Spritesheet Orientation’ property also has an effect on some gameplay features, like the damage sectors. So be sure that you save the ragdoll with the correct orientation.
Basic Setup for the Ragdoll
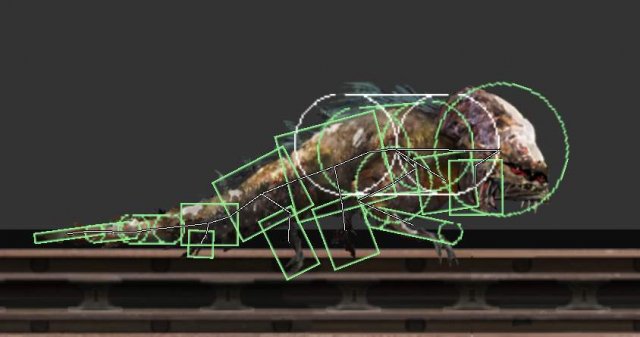
At this point, you should have a character with some limbs and joints ready. Limbs and joints together constitute the skeleton of a character, or a ragdoll, as we call it. Enable ‘Ragdoll’ on the ‘Modes’ panel to see the ragdoll drawn over the character. On the right, you will now see settings that affect the whole ragdoll.
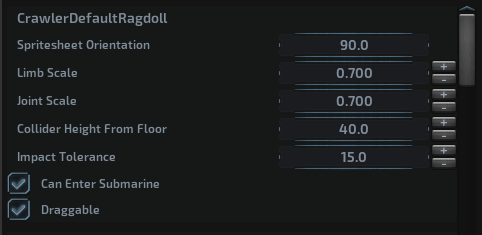
The characters have something called the ‘main collider’. This is an approximation of the character’s dimensions used for animations, multiplayer syncing and AI decisions. When you have the ‘Colliders’ mode enabled, the main collider is drawn in white (capsule) over the character. It’s important that the collider is of an approximately correct size. It’s also important that the ‘Height From Floor’ parameter is given a reasonable value. Otherwise the character won’t stand where it should. Note that this parameter has an effect only when the character is standing; it doesn’t affect swimming animations.
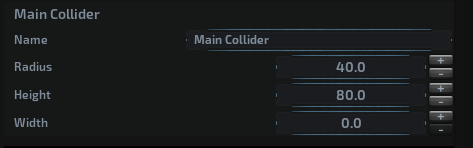
Enable ‘Parameters’ on the ‘Modes’ panel to see the parameter editor on the right. Ensure that the main collider is set up properly. You can now also review all the colliders of the limbs to check that they are the right shape and size.
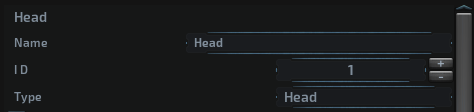
Yet another thing to check here are the limb types. Select the ‘Limbs’ mode to see the limb parameters for each limb in the parameter editor. Make sure that the character has a torso and/or a head, that the legs and arms are defined as such, and that the tail limbs are given the type ‘Tail’. If the limb types are wrong, your animations might not work as intended, because the system doesn’t know which limb it should move to make the character swim or walk, for example.
Tip: When you have limbs or joints selected, only the selected elements are shown in the parameter editor. If you want to see all the limbs or joints, deselect all by clicking the right mouse button.
When you are done, click the ‘Recreate Ragdoll’ button on the ‘Tools’ panel to apply the changes.
Tip: Currently there is no autosave in the editor (Sorry! We promise to do something about this later). Please use the quick save buttons often enough that you don’t lose your progress.
Tip: Try undo [ctrl+z] and redo [ctrl+r]. They should work for most things. Just don’t try to undo destroyed limbs or joints. That won’t work.
Animations
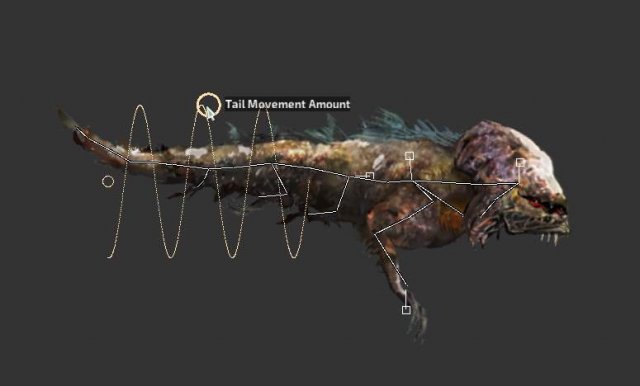
Animations are what make characters alive. Unlike in many other games, in Barotrauma the characters are entirely driven by physical forces. When we make the feet of the character to take steps or the tail to swing when the character swims, we actually define forces on the limbs.
Doing this kind of animation can be a bit different from doing ordinary animations with keyframes. We don’t have the same control on the movement. The upside is that the animations can adjust to the environment without any kind of tweening or blending from an animation clip to another – we don’t have any clips, but we do have animation definitions as a collection of parameters.
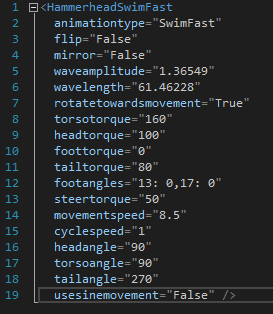
There are currently four animation types for the characters that you can edit: ‘Walk’, ‘Run’, ‘SwimSlow’, and ‘SwimFast’. Each of the animations is defined in a separate file and they have distinct parameters. Some of the parameters are common to all, some specific to the animation type. Most of these you don’t have to worry about, because you can easily experiment with the widgets that are drawn over the characters.
Tip: Press [e] to switch between grounded and swim animations. Press [Left shift] to switch between slow and fast movement animations. There’s also a drop down for selecting the animations.
However, there are some important parameters that you can edit only in the parameter editor. Select ‘Parameters’ on the right side of the editor view to open the parameter editor.
Tip: When the parameter editor is open, you can see which parameter(s) you are changing when dragging a widget over the character. The parameters that are updated should flash in green.
Limitations and Missing Features
There are some limitations to keep in mind when creating characters in the editor.
The most pressing of them are the following:
XML Tweaking: The Character Config File
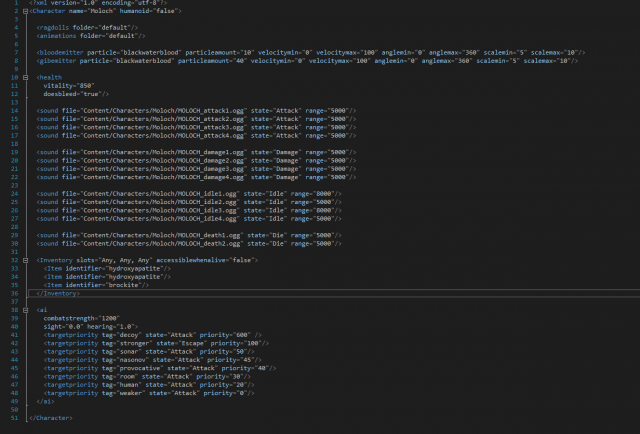
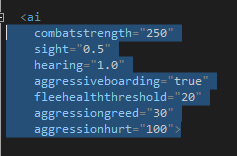
The two things that you will really need for your character are health and the AI. Health is pretty straightforward, but the AI might need a bit of explaining.
You might also want to add some sounds and particles (like blood) to your character. If you want the character to drop some items, give it an inventory too. Each of these should be easy enough to add. Just copy and paste the appropriate blocks from other files and adjust the values a bit.
XML Tweaking: The Ragdoll Files
Fortunately you can edit the attack parameters in the editor too (where you have the tooltips for most of them). So I’m not going through all the parameters here. Just copy and paste an attack block from another character’s ragdoll file and place it under the limb you want to use for the attack. This is much easier if you have given easily readable names to your limbs.
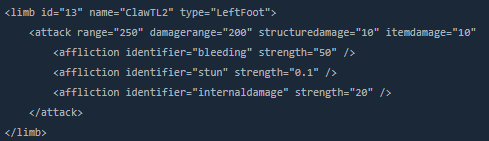
An important part that you unfortunately cannot see in the editor (for now, that is) is the afflictions. Afflictions are what actually do damage to characters. All the afflictions in the game are defined in Content/Afflictions.xml, where you can also create your own.
So, you might want to add some afflictions inside the attack blocks in the ragdoll file, like so:
Some other things you may want to try to add to your character are damage modifiers and deformations. Damage modifiers can be positive (>1) or negative ( Publishing Your Character
Custom characters need to be shared with other players so that you can play together with them in multiplayer mode.
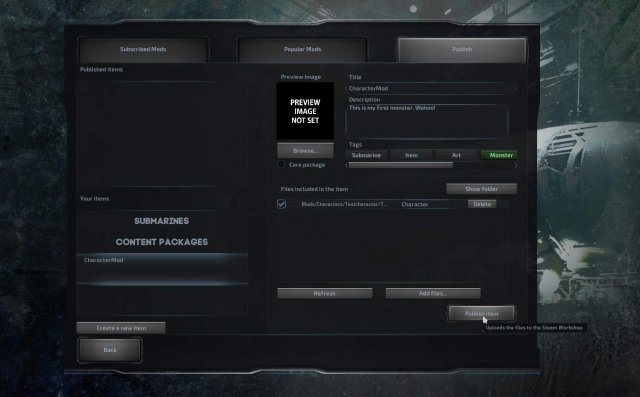
Fortunately, publishing a mod is fairly simple: first you need to select your newly created content package, which creates a folder called ‘NewWorkshopItem’ inside your game folder and copies the character file there. This folder and all its contents will be uploaded to the Workshop.
Make sure all the files required for your mod are present inside the folder: textures, audio, ragdoll and animation files. If you have wisely put everything in the same folder as the character config file, you shouldn’t have to manually add any additional files: the entire folder is included in the workshop item.
Once everything is ready, simply click ‘Publish item’. The mod should now be found in Steam workshop, where others can find and download it.
Barotrauma как создать персонажа


Написано для Barotrauma 0.9.1.0 itchyOwl’ом (перевел IDPixel_RUS)
Совет: используйте клавиши [1], [2] и [3] на клавиатуре для быстрого переключения между режимами редактирования конечностей, суставов и анимации.
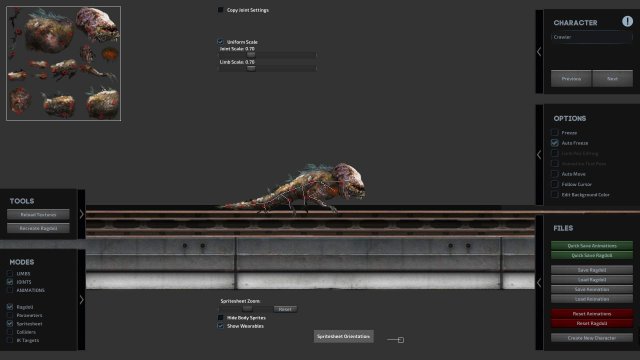
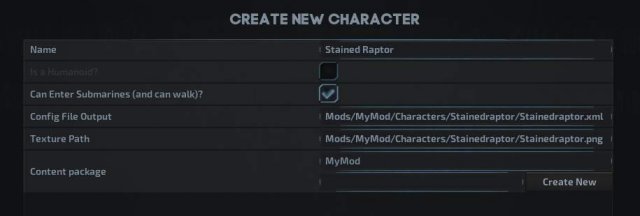
Чтобы создать нового персонажа, нажмите кнопку «Create New Character» на панели «Files». Следующее окно потребует основную информацию о персонаже, которого вы собираетесь создать. Пути к конфигурационному файлу и пути к текстуре относятся к папке проекта в папке игры.
Одна вещь, которую вы должны иметь под рукой в этот момент является текстура для персонажа. В Barotrauma все персонажи сделаны из конечностей, которые имеют спрайт. На практике вам понадобится лист спрайтов, где находятся спрайты для всех конечностей вашего персонажа. Запишите путь к файлу текстуры в поле «Texture Path».
Третье, что вам понадобится, это файл конфигурации персонажа, но он будет автоматически создан для вас. Вы можете определить путь к нему в поле «Config File Output». Можно оставить по умолчанию.
Не обращайте внимания на некоторые настройки. Они нужны, чтобы добавить некоторые конечности, которые мы будем редактировать позже. Кроме того, сейчас не рекомендуется определять суставы. Это можно сделать легче немного позже.
При создании нового персонажа вам будет предложено определить путь к файлу конфигурации персонажа (например, Mods/MyMod/Characters/Mycharacter.XML.) Настоятельно рекомендуется, чтобы текстовые и звуковые файлы были помещены в ту же папку или во вложенные папки в том же месте, что и файл конфигурации персонажа.
Когда в Редакторе создается новый персонаж, система автоматически добавляет ссылку на файл конфигурации символа в пакете содержимого и создает для вас файлы анимации и ragdoll.
Если по какой-то причине вы не хотите использовать пути по умолчанию, вы можете изменить пути в конфигурации персонажа, изменив значения атрибутов «folder» элементов «ragdolls» и «animations».
ВАЖНО: не переименовывайте файлы анимации или ragdoll, иначе игра не сможет их использовать. Надеюсь, в какой-то момент это изменится, но пока используйте имена файлов по умолчанию.
ВАЖНО: чтобы избежать проблем с файловой структурой, пожалуйста, используйте только заглавные буквы в имени персонажа. Имя персонажа должно совпадать с именем папки.
СОВЕТ: Вы можете иметь несколько рэгдоллов и анимаций для одного персонажа, но в настоящее время в игре используются только дефолтные.
Когда вы закончите с добавлением конечностей, нажмите кнопку «Create». Поначалу ваш персонаж будет выглядеть жутким месивом со всеми конечностями друг на друге. Это потому, что еще нет суставов, чтобы соединить и разделить разные конечности. Пока давайте просто проигнорируем, как персонаж выглядит в игровом представлении; он не будет выглядеть правильно, пока мы не добавим суставы.
СОВЕТ: вы можете добавить конечности после создания суставов и создать суставы до того, как конечности будут окончательными. Однако сначала легче определить конечности. Потом суставы. А затем повторить.
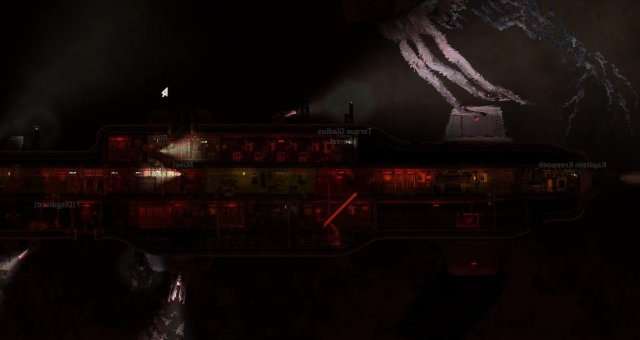
Хорошо, давайте начнем редактирование. Во-первых, убедитесь, что у вас есть переключатели «Spritesheet» и «Limbs», выбранные на панели «Modes». Также перейдите через переключатель «Adjust Collider», расположенный в верхней части экрана.
СОВЕТ: вы можете изменить форму коллайдера, регулируя размеры коллайдера из параметров. Включите переключатель «Parameters», чтобы увидеть параметры выбранной конечности.
Теперь вы увидите коллайдеры конечностей, нарисованные зеленым цветом над вашим персонажем. Выберите конечности над листом спрайта. Перетащите небольшой прямоугольник в левом верхнем углу, чтобы переместить исходный прямоугольник, и прямоугольник в правом нижнем углу, чтобы настроить размер исходного прямоугольника (и коллайдера).
Важно: когда включен режим «Adjust Collider», коллайдеры автоматически пересчитываются. Если коллайдеры имеют неправильный размер, столкновения не будут работать правильно. Если коллайдеры слишком малы, рэгдолл может быть нестабильным и даже взорваться.
СОВЕТ: используйте клавиши со стрелками для перемещения источника по прямой на один пиксель.
Вы можете добавить больше конечностей, дублируя существующую конечность. Выберите конечность и нажмите «Duplicate Limb» [ctrl+c]. Теперь следует выбрать новую конечность. Перетащите исходную прямую в нужное положение и отрегулируйте размер, как и с другими конечностями. Большинство конечностей также могут быть удалены [delete], но есть некоторые ограничения.
Когда вы закончите с основными конечностями (вам не нужно определять их все сразу), вы можете начать создавать суставы между конечностями.
Убедитесь, что выбран режим «Limbs». Затем выберите конечность и нажмите кнопку «Create Joint» [ctrl+e]. Теперь вы можете нарисовать сустав между двумя конечностями. Начальная точка соединения была определена при нажатии кнопки или горячей клавиши, и теперь вам нужно определить другой конец соединения. Для этого наведите курсор мыши на нужную конечность и выберите ее левой кнопкой мыши.
СОВЕТ: нажмите [ctrl], чтобы выбрать и отредактировать несколько конечностей или суставов одновременно.
СОВЕТ: в режиме редактирования соединения нажмите кнопку «Copy Joint Settings», чтобы скопировать настройки первого выбранного соединения в другие соединения.
Режим редактирования теперь должен автоматически измениться на «Joints». В этом режиме, мы можем увидеть совместные концы нарисованные как красные круги. Если вы выберете один из кругов, он изменит цвет и покажет три маленьких виджета рядом с каждым концом соединения.
СОВЕТ: вы можете редактировать и создавать конечности и суставы также над персонажем в игровом представлении, но обычно это проще сделать на листе спрайта.
Попробуйте перетащить круглый виджет. Это точка опоры сустава. Он определяет точку, от которой конечность прикреплена к другой конечности. Чем больше расстояние между двумя концами, тем длиннее соединение. И чем длиннее сустав, тем дальше конечности друг от друга.
СОВЕТ: если кажется, что конечности находятся друг над другом, а суставные концы выглядят правильно на листе спрайта, но неправильно в игровом представлении, попробуйте перевернуть суставные концы (т. е. просто перетащите их так, чтобы они поменялись местами).
СОВЕТ: по умолчанию вращения начинаются сверху и заканчиваются внизу, но «Spritesheet Orientation» влияет на это. Нажмите кнопку «Spritesheet» на панели «Modes», чтобы увидеть элементы управления ориентацией.
Можно, например, определить некоторые конечности слева направо, а другие сверху вниз, но в настоящее время вы можете иметь только одно универсальное смещение для персонажа. Вы можете свободно изменять ориентацию в зависимости от того, какой сустав вы в настоящее время редактируете, но это намного проще, если большинство спрайтов конечностей выложены в той же ориентации на листе спрайта.
Свойство ‘Spritesheet Orientation’ также влияет на некоторые игровые функции, такие как сектора повреждений. Поэтому убедитесь, что вы сохраните тряпичную куклу с правильной ориентацией.
В этот момент у вас должен быть персонаж с конечностями и суставами. Конечности и суставы вместе составляют скелет персонажа, или рэгдолл, как мы его называем. Включите «Ragdoll» на панели «Modes», чтобы увидеть рэгдолл, нарисованную над персонажем. Справа вы увидите настройки, которые влияют на весь рэгдолл.
У персонажей есть нечто под названием «main collider». Это приближение размеров персонажа, используемых для анимации, многопользовательской синхронизации и решений AI. Когда у вас включен режим «Colliders», основной коллайдер рисуется белым цветом (капсула) над персонажем. Важно, чтобы коллайдер имел приблизительно правильный размер. Также важно, чтобы параметру «Height From Floor» было присвоено разумное значение. В противном случае персонаж не будет стоять там, где должен. Обратите внимание, что этот параметр действует только тогда, когда символ стоит; это не влияет на анимацию плавания.
Включите «Parameters» на панели «Modes», чтобы увидеть редактор параметров справа. Убедитесь, что главный коллайдер настроен правильно. Теперь вы можете также просмотреть все коллайдеры конечностей, чтобы проверить, что они правильной формы и размера.
Еще одна вещь, чтобы проверить типы конечностей. Выберите режим «Limbs», чтобы просмотреть параметры конечностей для каждой конечности в Редакторе параметров. Убедитесь, что персонаж имеет туловище и/или голову, что ноги и руки определены как таковые, а хвостовые конечности имеют тип «Tail». Если типы конечностей неправильные, ваши анимации могут работать не так, как предполагалось, потому что система не знает, какую конечность она должна переместить, чтобы заставить персонажа плавать или ходить, например.
СОВЕТ: если выбраны конечности или суставы, в Редакторе параметров отображаются только выбранные элементы. Если вы хотите увидеть все конечности или суставы, снимите выделение со всего, щелкнув правой кнопкой мыши.
Когда вы закончите, нажмите кнопку «Recreate Ragdoll» на панели «Tools», чтобы применить изменения.
СОВЕТ: в настоящее время в Редакторе нет автосохранения (извините! Мы обещаем сделать это позже). Пожалуйста, используйте кнопки быстрого сохранения почаще, чтобы не потеряете ваш прогресс.
СОВЕТ: попробуйте отменить [ctrl+z] и повторить [ctrl+r]. Они должны работать для большинства вещей. Только не пытайтесь восстановить разрушенные конечности или суставы. Это не сработает.
Анимации делает героев живыми. В отличие от многих других игр, в Barotrauma персонажи полностью управляются физическими силами. Когда мы заставляем ноги персонажа делать шаги или хвост качаться, когда персонаж плавает, мы фактически определяем силы на конечностях.
Выполнение такого рода анимации может немного отличаться от выполнения обычных анимаций с ключевыми кадрами. У нас нет такого же контроля над движением. Положительным моментом является то, что анимация может адаптироваться к окружающей среде без какого – либо изменения или смешивания из анимационного клипа в другой-у нас нет клипов, но у нас есть определения анимации как набор параметров.
В настоящее время существует четыре типа анимации для персонажей, которые вы можете редактировать: ‘Walk’, ‘Run’, ‘SwimSlow’ и ‘SwimFast’. Каждая анимация определяется в отдельном файле и имеет различные параметры. Некоторые параметры являются общими для всех, некоторые специфичны для типа анимации. Большинство из них вам не придется беспокоиться, потому что вы можете легко экспериментировать с виджетами, которые рисуются поверх персонажей.
СОВЕТ: нажмите [e] для переключения между анимацией хождения и плавания. Нажмите [сдвиг влево] для переключения между медленными и быстрыми анимациями движения. Там также есть выпадающее меню для выбора анимации.
Однако есть некоторые важные параметры, которые можно редактировать только в Редакторе параметров. Выберите «Parameters» в правой части окна редактора, чтобы открыть редактор параметров.
При создании персонажей в Редакторе необходимо учитывать некоторые ограничения.
Наиболее актуальными из них являются следующие:
СОВЕТ: редактирование xml-файлов могут быть пугающими на первый взгляд, но это не так сложно. Просто проверьте существующие файлы персонажей и берите оттуда.
Вы также можете добавить какие-нибудь звуки и частицы (например, кровь) к вашему персонажу. Если вы хотите, чтобы персонаж дропал какие-нибудь предметы, добавьте ему инвентарь. Это довольно легко сделать. Просто скопируйте и вставьте соответствующие блоки из других файлов и немного отрегулируйте значения.
К счастью, вы также можете редактировать параметры атаки в редакторе (где у вас есть подсказки для большинства из них). Так что я не собираюсь здесь рассказывать про все параметры. Просто скопируйте и вставьте блок атаки из файла ragdoll другого персонажа и поместите его на конечность, которую вы хотите использовать для атаки. Это намного проще, если вы дали легко читаемые имена своим конечностям.
Таким образом, вы можете добавить некоторые недуги внутри блоков атаки в файле ragdoll, например: